Page 5 of 16
SU14.2-3 | Surgical Approaches, Instruments and Wound Closure — SDL Guide (Part 2)
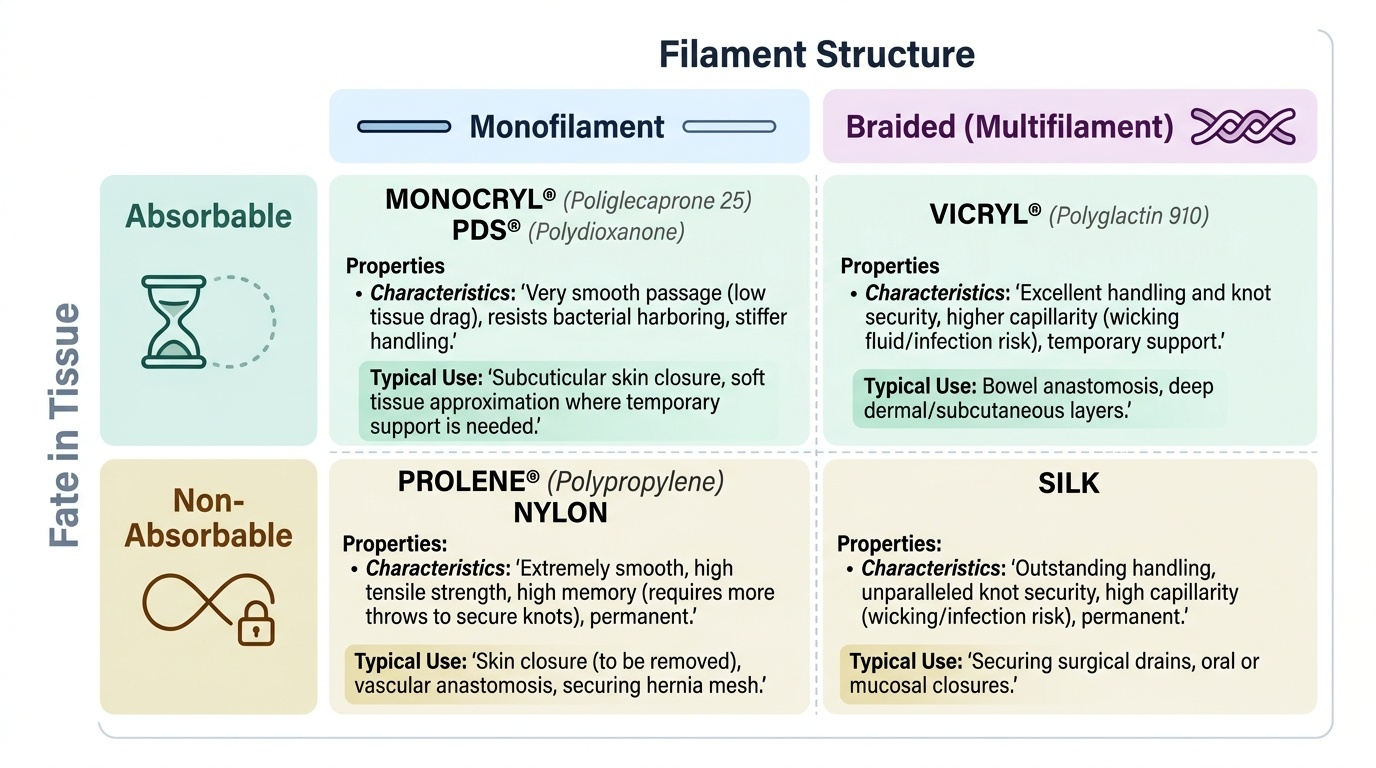
Sutures, Needles and Knots — Materials and Technique
Closing a wound or joining two hollow structures depends on choosing the right thread, the right needle and a secure knot. A suture is the material used to hold tissue together, and sutures are classified in two complementary ways that you must keep separate. The first axis is by fate in tissue: absorbable sutures are broken down by the body over weeks to months and are used where temporary support is enough (for example deep layers and bowel) — examples are catgut (now largely withdrawn in many countries), polyglactin 910 (Vicryl), poliglecaprone (Monocryl) and polydioxanone (PDS); non-absorbable sutures persist and are used where long-term strength is needed or where they will be removed — examples are silk, polypropylene (Prolene), nylon and steel. The second, independent axis is by filament structure: a monofilament suture is a single smooth strand (Prolene, nylon, PDS, Monocryl) that passes through tissue with little drag and harbours fewer bacteria, but holds knots less securely and can be stiffer to handle; a braided (multifilament) suture is many strands plaited together (silk, Vicryl) that handles and knots beautifully but has greater capillarity and so can wick fluid and harbour infection. The same material therefore has a position on both axes — Vicryl is absorbable AND braided; Prolene is non-absorbable AND monofilament. Suture thickness is given on the USP gauge, where more zeros mean a finer thread (5-0 is thinner than 2-0). The needle is chosen by tissue: a round-bodied (taper) needle parts soft tissue such as bowel and vessels without cutting, while a cutting needle has sharp edges to penetrate tough skin and fascia. Finally, the thread is secured with knots — the square (reef) knot of two opposite throws is the standard secure knot, the surgeon's knot adds an extra first throw to stop slippage, and in surgery these are usually placed as an instrument tie using the needle holder. Wounds are then closed by simple interrupted sutures (each tied separately — secure and adjustable), a continuous suture (faster, even tension), a buried subcuticular suture (best cosmesis), or mattress sutures (vertical or horizontal, for eversion and tension), while joining two hollow viscera is an anastomosis that obeys its own principles.
Provided image
| Suture | Absorbable? | Filament | Typical use |
|---|---|---|---|
| Polyglactin 910 (Vicryl) | Absorbable | Braided | Deep layers, ligatures, bowel |
| Poliglecaprone (Monocryl) | Absorbable | Monofilament | Subcuticular skin closure |
| Polydioxanone (PDS) | Absorbable | Monofilament | Slow-healing layers, abdominal mass closure |
| Silk | Non-absorbable | Braided | Drains, ties; easy handling |
| Polypropylene (Prolene) | Non-absorbable | Monofilament | Skin, vascular, hernia mesh |
| Nylon | Non-absorbable | Monofilament | Skin closure (removed) |
Reading Tissue and the Wound to Choose Closure
Selecting the closure is an act of interpretation: you read the tissue, the tension and the contamination of the wound and then match suture, needle and technique to what you see. The first thing to read is tissue type. Soft, delicate tissue — bowel wall, vessels, peritoneum — calls for a round-bodied needle and a fine, often absorbable suture so you part the tissue rather than cut it; tough tissue — skin, fascia, tendon — calls for a cutting needle and a stronger suture. The second thing to read is how long support is needed, which follows wound healing: a fast-healing mucosa needs only short-term support (an absorbable suture), whereas a slow-healing fascia or abdominal wall needs prolonged strength (a long-lasting absorbable such as PDS, or a non-absorbable). The third is tension: a wound under tension needs interrupted or mattress sutures that distribute and evert the edges, and crucially each throw must approximate the edges, not strangle them — sutures tied too tightly cut off the blood supply and cause the very breakdown they were meant to prevent. The fourth is contamination and cosmesis: a contaminated wound favours monofilament (less capillarity, fewer harboured bacteria) and may be left to heal by secondary intention, while a clean wound where appearance matters favours a buried subcuticular monofilament for the finest scar. Joining two hollow viscera applies the same reading at higher stakes through the principles of anastomosis: an anastomosis must have a good blood supply at both ends, be free of tension, achieve accurate apposition (mucosa to mucosa, layer to layer), and have no distal obstruction beyond it — break any one of these and the join leaks. The choice of closure is therefore never automatic; it is reasoned each time from the wound in front of you.

Provided image
| Technique | Typical indication | Main advantage |
|---|---|---|
| Simple interrupted | Most skin and general closures | Secure; one failed stitch does not undo the whole wound; adjustable |
| Continuous (running) | Long wounds, fascia, even-tension closure | Fast; distributes tension evenly |
| Subcuticular | Clean wounds where cosmesis matters | Best scar; no cross-hatch marks |
| Vertical mattress | Wounds needing edge eversion | Strong eversion and approximation of deep + superficial |
| Horizontal mattress | High-tension wounds | Spreads tension; good haemostasis at edges |
CLINICAL PEARL
Keep the two suture classifications separate — absorbable-versus-non-absorbable describes what happens to the thread over time, while monofilament-versus-braided describes its physical structure, and a single suture has a position on BOTH axes (Vicryl is absorbable and braided; Prolene is non-absorbable and monofilament). When closing, remember the most common beginner's error: sutures are tied to APPROXIMATE the wound edges, never to strangle them — a throw pulled too tight blanches the edge, cuts off its blood supply, and causes the dehiscence or necrosis it was meant to prevent. Approximate, do not strangulate.
Practising Instrument Handling and Closure in Simulation
Knowing the materials is necessary but not sufficient — the competency is demonstrated by handling instruments and closing a wound cleanly under supervision, which is exactly what the skills laboratory is for. The routine is rehearsed on a suture pad or simulated tissue until it is fluent and atraumatic, always within the sterile field practised in su11-asepsis. First, hold each instrument correctly: the scalpel held like a pen or in a palmed grip as the cut requires; scissors and needle holders held with the thumb and ring finger in the rings and the index finger steadying the shaft for control; forceps held like a pencil in the non-dominant hand to present tissue. Next, load the needle in the needle holder about two-thirds of the way from the tip, mount it correctly for a forehand throw, and pass it through the tissue following the curve of the needle so it parts rather than tears the edge. Then place a simple interrupted suture: enter perpendicular to the skin, take equal bites of each edge at equal depth so the edges meet level, and secure it with an instrument tie — laying a square knot with the needle holder, adding extra throws for security, and tightening only enough to approximate the edges. Practise an even row of interrupted sutures with consistent spacing and tension, then progress to a continuous and a subcuticular line. Throughout, handle tissue gently with non-toothed forceps where it is delicate, keep the field clean, and account for every needle and instrument. Repeated supervised practice is what converts these named steps into safe, automatic hand skills.